nginx build form source on Fedora23 Server (OSX VirtualBox)
OSX VirtualBox上のまっさらなFedora23Serverにnginxをsourceからビルド
最短距離
$ sudo dnf install git gcc pcre-devel zlib-devel openssl-devel
$ git clone https://github.com/nginx/nginx.git
$ cd nginx
$ ./auto/configure --with-openssl=/usr/lib64/openssl
$ make
$ sudo make install
$ sudo chmod +x /usr/local/nginx/sbin/nginx
$ sudo /usr/local/nginx/sbin/nginx -V
nginx version: nginx/1.9.10
built by gcc 5.3.1 20151207 (Red Hat 5.3.1-2) (GCC)
configure arguments: --with-openssl=/usr/lib64/openssl
$ sudo firewall-cmd --permanent --add-service=http
success
$ sudo firewall-cmd --permanent --add-port=80/tcp
success
$ sudo systemctl restart firewalld
$ sudo firewall-cmd --list-all
FedoraServer (default, active)
  interfaces: enp0s3
  sources:
  services: cockpit dhcpv6-client http https ssh
  ports: 80/tcp
  masquerade: no
  forward-ports:
  icmp-blocks:
  rich rules:
以下、遭遇したエラー
gccがない
$ ./auto/configure
checking for OS
 + Linux 4.2.3-300.fc23.x86_64 x86_64
checking for C compiler ... not found

./auto/configure: error: C compiler cc is not found
gccを入れる
$ sudo dnf install gcc
pcreがない
$ ./auto/configure
~ 省略
checking for PCRE library ... not found
checking for PCRE library in /usr/local/ ... not found
checking for PCRE library in /usr/include/pcre/ ... not found
checking for PCRE library in /usr/pkg/ ... not found
checking for PCRE library in /opt/local/ ... not found

./auto/configure: error: the HTTP rewrite module requires the PCRE library.
You can either disable the module by using --without-http_rewrite_module
option, or install the PCRE library into the system, or build the PCRE library
statically from the source with nginx by using --with-pcre=<path> option.
pcreを入れる
$ sudo dnf install pcre-develop
zlibがない
$ ./auto/configure
~ 省略
checking for zlib library ... not found

./auto/configure: error: the HTTP gzip module requires the zlib library.
You can either disable the module by using --without-http_gzip_module
option, or install the zlib library into the system, or build the zlib library
statically from the source with nginx by using --with-zlib=<path> option.
zilbを入れる
$ sudo dnf install zlib-devel
opensslがない
$ ./auto/configure
~ 省略

Configuration summary
  + using system PCRE library
  + OpenSSL library is not used
  + using builtin md5 code
  + sha1 library is not found
  + using system zlib library
opensslを入れる、オプション指定する
$ sudo dnf install openssl-devel
$ ./auto/configure --with-openssl=/usr/lib64/openssl
port 80に接続できない
firewalldで許可する
$ sudo firewall-cmd --permanent --add-service=http
success
$ sudo firewall-cmd --permanent --add-port=80/tcp
success
$ sudo systemctl restart firewalld
$ sudo firewall-cmd --list-all
FedoraServer (default, active)
  interfaces: enp0s3
  sources:
  services: cockpit dhcpv6-client http https ssh
  ports: 80/tcp
  masquerade: no
  forward-ports:
  icmp-blocks:
  rich rules:
Scala Play activator on OSX
久しぶりにScala Play環境作ったらactivator というものが出てきたらしい。
"Typesafe Activator は activator ui と activator new という 2つのコマンドを追加するカスタム版の sbt だ。 つまり、activator は sbt のスーパーセットであると言える。"
始める sbt — Typesafe Activator (sbt を含む) のインストール
あ、はい。
以下を見ながらすすめた。
https://www.playframework.com/documentation/ja/2.3.x/Installing
javaのバージョン確認
Download | The Scala Programming Language
[dela@MacBook-Air dela] javac -version
Picked up JAVA_TOOL_OPTIONS: -Dfile.encoding=UTF-8
javac 1.6.0_65
[dela@MacBook-Air dela] java -version
Picked up JAVA_TOOL_OPTIONS: -Dfile.encoding=UTF-8
java version "1.6.0_65"
Java(TM) SE Runtime Environment (build 1.6.0_65-b14-466.1-11M4716)
Java HotSpot(TM) 64-Bit Server VM (build 20.65-b04-466.1, mixed mode)
Scala 2.11.7はjdk1.6以上が必要。だから大丈夫な、はず。更新はあとでやろうと思う。
brew installで最新がインストールされる。
[dela@MacBook-Air dela] brew info scala
scala: stable 2.11.7 (bottled), devel 2.12.0-M1
Scala programming language
http://www.scala-lang.org/
/usr/local/Cellar/scala/2.11.7 (46 files, 31M) *
  Poured from bottle
From: https://github.com/Homebrew/homebrew/blob/master/Library/Formula/scala.rb
==> Options
--with-docs
	Also install library documentation
--with-src
	Also install sources for IDE support
--devel
	Install development version 2.12.0-M1
==> Caveats
To use with IntelliJ, set the Scala home to:
  /usr/local/opt/scala/idea

Bash completion has been installed to:
  /usr/local/etc/bash_completion.d

[dela@MacBook-Air dela] brew install scala
==> Downloading https://homebrew.bintray.com/bottles/scala-2.11.7.yosemite.bottle.tar.gz
######################################################################## 100.0%
==> Pouring scala-2.11.7.yosemite.bottle.tar.gz
==> Caveats
To use with IntelliJ, set the Scala home to:
  /usr/local/opt/scala/idea

Bash completion has been installed to:
  /usr/local/etc/bash_completion.d
==> Summary
🍺  /usr/local/Cellar/scala/2.11.7: 46 files, 31M
activatorをダウンロードしてパスを通す。
Build Reactive Applications with Typesafe Activator | @typesafe
export PATH=$PATH:/path/to/activator-dist-1.3.7
activatorコマンドの確認
[dela@MacBook-Air dela] activator -help
Usage: activator <command> [options]

  Command:
  ui                 Start the Activator UI
  new [name] [template-id]  Create a new project with [name] using template [template-id]
  list-templates     Print all available template names
  -h | -help         Print this message

  Options:
  -v | -verbose      Make this runner chattier
  -d | -debug        Set sbt log level to debug
  -mem <integer>     Set memory options (default: , which is -Xms1024m -Xmx1024m -XX:MetaspaceSize=64m -XX:MaxMetaspaceSize=256m)
  -jvm-debug <port>  Turn on JVM debugging, open at the given port.

  # java version (default: java from PATH, currently java version "1.8.0_65")
  -java-home <path>  Alternate JAVA_HOME

  # jvm options and output control
  -Dkey=val          Pass -Dkey=val directly to the java runtime
  -J-X               Pass option -X directly to the java runtime
                     (-J is stripped)

  # environment variables (read from context)
  JAVA_OPTS          Environment variable, if unset uses ""
  SBT_OPTS           Environment variable, if unset uses ""
  ACTIVATOR_OPTS     Environment variable, if unset uses ""

In the case of duplicated or conflicting options, the order above
shows precedence: environment variables lowest, command line options highest.
Scala Play アプリを新規作成して、activatorコンソールを起動する。
[dela@MacBook-Air develop] activator new my-first-app play-scala
[dela@MacBook-Air develop] cd my-first-app/
[dela@MacBook-Air my-first-app] activator
#省略
[error] java.lang.UnsupportedClassVersionError: org/webjars/WebJarExtractor$Cache : Unsupported major.minor version 51.0
jdkを更新。使おうとしてるバージョンに合わせる。
Java SE - Downloads | Oracle Technology Network | Oracle
ダウンロードして.zshrcのJAVA_HOMEを以下に変更
export JAVA_HOME=`/usr/libexec/java_home -v 1.8`
activatorコンソールを再起動する。
[dela@MacBook-Air my-first-app] activator
Picked up JAVA_TOOL_OPTIONS: -Dfile.encoding=UTF-8
[info] Loading project definition from /Users/dela/Documents/develop/scala/my-first-app/project
[info] Set current project to my-first-app (in build file:/Users/dela/Documents/develop/scala/my-first-app/)
[my-first-app] $
アプリを起動。初回は相変わらずすごく時間かかる
[my-first-app] $ run
[info] Updating {file:/Users/dela/Documents/develop/scala/my-first-app/}root...
[info] Resolving jline#jline;2.12.1 ...
[info] downloading https://repo1.maven.org/maven2/com/typesafe/play/play-server_2.11/2.4.6/play-server_2.11-2.4.6.jar ...
[info] 	[SUCCESSFUL ] com.typesafe.play#play-server_2.11;2.4.6!play-server_2.11.jar (847ms)
[info] downloading https://repo1.maven.org/maven2/com/typesafe/play/play-netty-server_2.11/2.4.6/play-netty-server_2.11-2.4.6.jar ...
[info] 	[SUCCESSFUL ] com.typesafe.play#play-netty-server_2.11;2.4.6!play-netty-server_2.11.jar (539ms)
[info] downloading https://repo1.maven.org/maven2/com/typesafe/play/play-jdbc_2.11/2.4.6/play-jdbc_2.11-2.4.6.jar ...
[info] 	[SUCCESSFUL ] com.typesafe.play#play-jdbc_2.11;2.4.6!play-jdbc_2.11.jar (430ms)
[info] downloading https://repo1.maven.org/maven2/com/typesafe/play/play-cache_2.11/2.4.6/play-cache_2.11-2.4.6.jar ...
[info] 	[SUCCESSFUL ] com.typesafe.play#play-cache_2.11;2.4.6!play-cache_2.11.jar (426ms)
[info] downloading https://repo1.maven.org/maven2/com/typesafe/play/play-ws_2.11/2.4.6/play-ws_2.11-2.4.6.jar ...
[info] 	[SUCCESSFUL ] com.typesafe.play#play-ws_2.11;2.4.6!play-ws_2.11.jar (651ms)
[info] downloading https://repo1.maven.org/maven2/com/typesafe/play/play_2.11/2.4.6/play_2.11-2.4.6.jar ...
[info] 	[SUCCESSFUL ] com.typesafe.play#play_2.11;2.4.6!play_2.11.jar (1459ms)
[info] downloading https://repo1.maven.org/maven2/com/typesafe/play/play-iteratees_2.11/2.4.6/play-iteratees_2.11-2.4.6.jar ...
[info] 	[SUCCESSFUL ] com.typesafe.play#play-iteratees_2.11;2.4.6!play-iteratees_2.11.jar (553ms)
[info] downloading https://repo1.maven.org/maven2/com/typesafe/play/play-json_2.11/2.4.6/play-json_2.11-2.4.6.jar ...
[info] 	[SUCCESSFUL ] com.typesafe.play#play-json_2.11;2.4.6!play-json_2.11.jar (552ms)
[info] downloading https://repo1.maven.org/maven2/com/typesafe/play/play-netty-utils/2.4.6/play-netty-utils-2.4.6.jar ...
[info] 	[SUCCESSFUL ] com.typesafe.play#play-netty-utils;2.4.6!play-netty-utils.jar (419ms)
[info] downloading https://repo1.maven.org/maven2/com/typesafe/play/play-functional_2.11/2.4.6/play-functional_2.11-2.4.6.jar ...
[info] 	[SUCCESSFUL ] com.typesafe.play#play-functional_2.11;2.4.6!play-functional_2.11.jar (438ms)
[info] downloading https://repo1.maven.org/maven2/com/typesafe/play/play-datacommons_2.11/2.4.6/play-datacommons_2.11-2.4.6.jar ...
[info] 	[SUCCESSFUL ] com.typesafe.play#play-datacommons_2.11;2.4.6!play-datacommons_2.11.jar (426ms)
[info] downloading https://repo1.maven.org/maven2/com/typesafe/play/play-jdbc-api_2.11/2.4.6/play-jdbc-api_2.11-2.4.6.jar ...
[info] 	[SUCCESSFUL ] com.typesafe.play#play-jdbc-api_2.11;2.4.6!play-jdbc-api_2.11.jar (424ms)
[info] downloading https://repo1.maven.org/maven2/com/typesafe/play/play-test_2.11/2.4.6/play-test_2.11-2.4.6.jar ...
[info] 	[SUCCESSFUL ] com.typesafe.play#play-test_2.11;2.4.6!play-test_2.11.jar (431ms)
[info] downloading https://repo1.maven.org/maven2/com/typesafe/play/play-specs2_2.11/2.4.6/play-specs2_2.11-2.4.6.jar ...
[info] 	[SUCCESSFUL ] com.typesafe.play#play-specs2_2.11;2.4.6!play-specs2_2.11.jar (424ms)
[info] downloading https://repo1.maven.org/maven2/com/typesafe/play/play-omnidoc_2.11/2.4.6/play-omnidoc_2.11-2.4.6.jar ...
[info] 	[SUCCESSFUL ] com.typesafe.play#play-omnidoc_2.11;2.4.6!play-omnidoc_2.11.jar (2169ms)
[info] downloading https://repo1.maven.org/maven2/com/typesafe/play/play-docs_2.11/2.4.6/play-docs_2.11-2.4.6.jar ...
[info] 	[SUCCESSFUL ] com.typesafe.play#play-docs_2.11;2.4.6!play-docs_2.11.jar (1464ms)
[info] Done updating.

--- (Running the application, auto-reloading is enabled) ---

[info] p.c.s.NettyServer - Listening for HTTP on /0:0:0:0:0:0:0:0:9000

(Server started, use Ctrl+D to stop and go back to the console...)

[info] Compiling 7 Scala sources and 1 Java source to /Users/dela/Documents/develop/scala/my-first-app/target/scala-2.11/classes...
[info] 'compiler-interface' not yet compiled for Scala 2.11.6. Compiling...
[info]   Compilation completed in 16.004 s
[info] - play.api.Play - Application started (Dev)
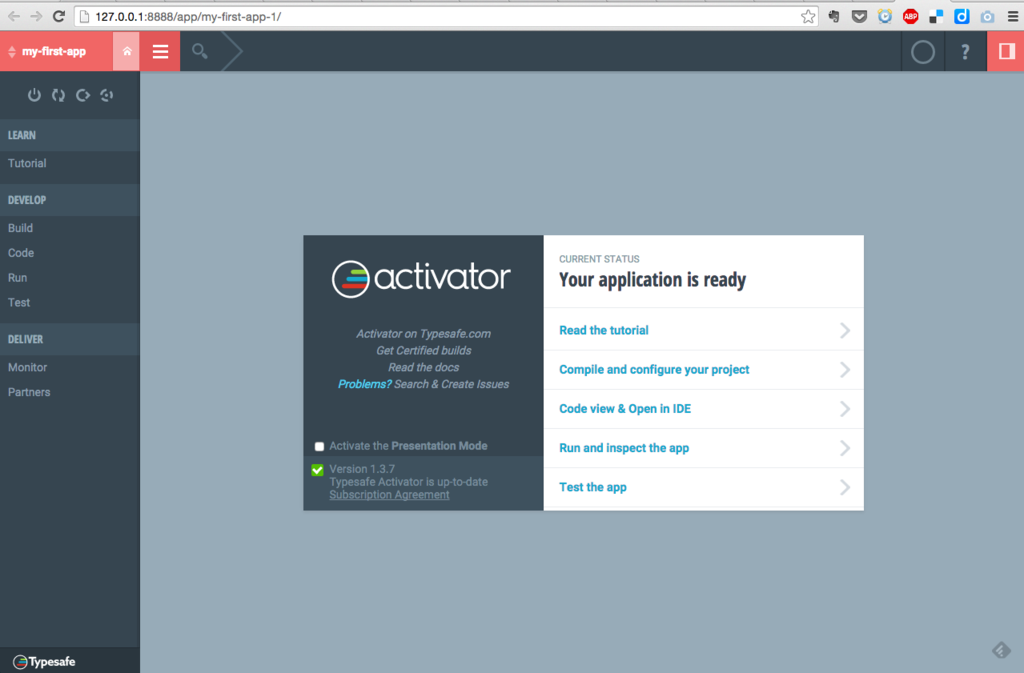
activator ui 使ってみた。
[dela@MacBook-Air my-first-app] activator ui
脇のメニューから大体できること想像がつく。サーバーのコードをブラウザから変更できそう。
使ってみないと判断できないけど、思想は進んでる。

MySQL innodb-memcached on OS X
OS X のMySQLで innodb-memcached を試す。
環境
OS X 10.10.5
公式ドキュメント
https://dev.mysql.com/doc/refman/5.6/ja/innodb-memcached-prereqs.html
https://dev.mysql.com/doc/refman/5.6/ja/innodb-memcached-installing.html
libmemcached.so image not found
1番楽そうなbrew install で試す
mysqlをインストールして、innnodb_memcached_config.sqlを流し込む、プラグインを有効にする
% brew install mysql
% mysql -u root <  /usr/local/Cellar/mysql/5.7.9/share/mysql/innodb_memcached_config.sql
% mysql -u root
Welcome to the MySQL monitor.  Commands end with ; or \g.
Your MySQL connection id is 4
Server version: 5.7.9 Homebrew

Copyright (c) 2000, 2015, Oracle and/or its affiliates. All rights reserved.

Oracle is a registered trademark of Oracle Corporation and/or its
affiliates. Other names may be trademarks of their respective
owners.

Type 'help;' or '\h' for help. Type '\c' to clear the current input statement.

mysql> SELECT * FROM innodb_memcache.containers\G
*************************** 1. row ***************************
                  name: aaa
             db_schema: test
              db_table: demo_test
           key_columns: c1
         value_columns: c2
                 flags: c3
            cas_column: c4
    expire_time_column: c5
unique_idx_name_on_key: PRIMARY
1 row in set (0.00 sec)

mysql> SELECT * FROM test.demo_test;
+----+--------------+------+------+------+
| c1 | c2           | c3   | c4   | c5   |
+----+--------------+------+------+------+
| AA | HELLO, HELLO |    8 |    0 |    0 |
+----+--------------+------+------+------+
1 row in set (0.00 sec)

mysql> INSTALL PLUGIN daemon_memcached soname "libmemcached.so";
ERROR 1126 (HY000): Can't open shared library '/usr/local/Cellar/mysql/5.7.9/lib/plugin/libmemcached.so' (errno: 2 dlopen(/usr/local/Cellar/mysql/5.7.9/lib/plugin/libmemcached.so, 2): image not found)
エラー。libmemcached.soが存在しない。lsコマンドでディレクトリをみる限り確かになかった。他をfindしても無い
API version for DAEMON plugin is too different
MySQL :: Download MySQL Community Server
上記のURLのソースコードをダウンロードすればlibmemcached.soは含まれてるけど、バージョンが5.7.10。
brew install mysql でインストールされるmysqlは 5.7.9。
なのでlibmemcached.soを/usr/local/Cellar/mysql/5.7.9/lib/plugin/ディレクトリにコピーしてもエラー。
mysql>  INSTALL PLUGIN daemon_memcached soname "libmemcached.so";
ERROR 1126 (HY000): Can't open shared library 'libmemcached.so' (errno: 0 API version for DAEMON plugin is too different)
解決方法
MySQL :: Download MySQL Community Server
dmgでインストールしたmysqlならlibmemcached.soが含まれる。
あとは公式ドキュメント通りの手順でOK
dmgダウンロード後、クリックしてインストール開始。終了ポップアップにrootパスワードが表示されるのでメモっておく
/usr/local/mysql/bin/mysql_secure_installation
/usr/local/mysql/bin/mysqld_safe
/usr/local/mysql/bin/mysql -u root -p <  /usr/local/mysql/share/innodb_memcached_config.sql
/usr/local/mysql/bin/mysql -u root -p
mysql>  INSTALL PLUGIN daemon_memcached soname "libmemcached.so";
Query OK, 0 rows affected (0.01 sec)
telnetでset, get試す
telnet 127.0.0.1 11211
Trying 127.0.0.1...
Connected to localhost
set key1 0 0 5
abcde
STORED
get key1
VALUE key1 0 5
abcde
END
get key2
END
phoenix アプリのフロントエンド(html/css/javascript)更新をsystemdのunitファイルに追加した
今のsystemd unitファイルはこんな感じ。フロントエンド更新のためにExecStartPreを追加した。
[root@host ~]# cat /usr/lib/systemd/system/phoenix.service
[Unit]
Description = hello phoenix

[Service]
EnvironmentFile=/etc/environments/phoenix
WorkingDirectory=/home/dela/www/hello/
ExecStartPre=/usr/local/src/elixir-1.1.1/bin/elixir /usr/local/src/elixir-1.1.1/bin/mix clean
ExecStartPre=/usr/local/src/elixir-1.1.1/bin/elixir /usr/local/src/elixir-1.1.1/bin/mix deps.get --only prod
ExecStartPre=node node_modules/brunch/bin/brunch build
ExecStartPre=/usr/local/src/elixir-1.1.1/bin/elixir /usr/local/src/elixir-1.1.1/bin/mix phoenix.digest
ExecStartPre=/usr/local/src/elixir-1.1.1/bin/elixir /usr/local/src/elixir-1.1.1/bin/mix compile.protocols
ExecStart=/usr/local/src/elixir-1.1.1/bin/elixir -pa _build/prod/consolidated -S /usr/local/src/elixir-1.1.1/bin/mix phoenix.server
Restart = always
Type = simple
User = dela

[Install]
WantedBy = multi-user.target
以下、追加したコマンド
mix clean
Delete generated application files.
前回のコンパイル結果を削除
Mix.Tasks.Clean
mix deps.get --only prod
Get all out of date dependencies, i.e. dependencies that are not available or have an invalid lock. --only - only fetch dependencies for given environment.
プロダクトモード用の依存パッケージの解決
Mix.Tasks.Deps.Get
brunch build
builds a project for distribution. By default it enables minification.
フロントエンドのコンパイル
brunchって知らなかった。phoenixのアプリのデフォルトのfrontend build tool。glupとかに変更もできる。
Brunch - ultra-fast HTML5 build tool
mix phoenix.digest
Digests and compress static files.
コンパイル結果をphoenixアプリが参照してるディレクトリへ配置
Mix.Tasks.Phoenix.Digest – Phoenix v1.0.3
IOでFizzBuzz
銀座で終電逃して六本木に戻ってIO書いた。眠い
Fedora22のログインシェルを楽しげに表示する
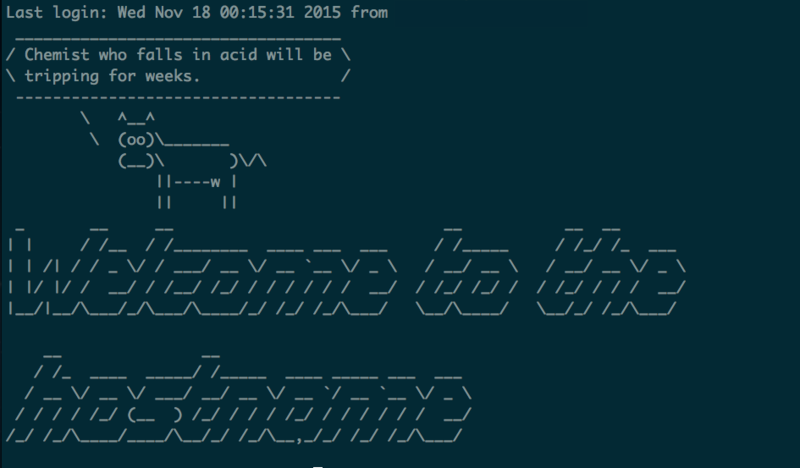
ログインシェルをこうする。

楽しげなパッケージをインストール
[root@host ~]# yum install cowsay fortune-mod figlet
Yum command has been deprecated, redirecting to '/usr/bin/dnf install cowsay fortune-mod figlet'.
Fedora22からyumの代わりにdnfというパッケージ管理が採用された。
yumはpython2でしか動かない、Fedora23でpython3が入る予定。
dnf install cowsay fortune-mod figlet
.bashrcに以下を記載
exec fortune | cowsay
figlet -f slant Welcome to the `hostname`
sshなどでログインすると牛が毎回しゃべる。
phoenix app using systemd on fedora22(GMO Conoha)
.serviceファイルを作る
[root@host ~]# touch /usr/lib/systemd/system/phoenix.service
[root@host ~]# vim /usr/lib/systemd/system/phoenix.service
[root@host ~]# cat /usr/lib/systemd/system/phoenix.service
[Unit]
Description = hello phoenix

[Service]
EnvironmentFile=/etc/environments/phoenix
WorkingDirectory=/home/dela/www/hello/
ExecStart = /usr/local/src/elixir-1.1.1/bin/elixir -pa _build/prod/consolidated -S /usr/local/src/elixir-1.1.1/bin/mix phoenix.server
Restart = always
Type = simple
User = dela

[Install]
WantedBy = multi-user.target
環境変数もファイルへ記述
[root@host ~]# mkdir /etc/environments/
[root@host ~]# vim /etc/environments/phoenix
[root@host ~]# cat /etc/environments/phoenix
MIX_ENV=prod
PORT=4001
serviceが認識されているか確認
[root@host ~]# systemctl list-unit-files --type=service | grep phoenix
phoenix.service                             disabled
自動起動に登録
[root@host ~]# sudo systemctl enable phoenix
Created symlink from /etc/systemd/system/multi-user.target.wants/phoenix.service to /usr/lib/systemd/system/phoenix.service.
[root@host ~]# systemctl list-unit-files --type=service | grep phoenix
phoenix.service                             enabled
デーモン起動
[root@host ~]# sudo systemctl start phoenix